
Grow and Care Guide
Grow and Care Overview
Below is a our recommendations for growing and caring for the seeds we sell. Let us know if you have any questions. We are always happy to help!
The basic process to the grow Pure MicroGreens is to 1.) Germinate them (with water) 2. Move then under lights for the vegetation stage while you modify how you water them 3.) Allow the required time for each stage 4.) Harvest & enjoy. See the details and fun varieties below.
The medium and more challenging MicroGreens require additional steps like pre-soaking and a bit more patience. As you start growing them, you’ll notice your enthusiasm expanding. Soon, you’ll become part of the vibrant, large community of urban gardeners who embrace this healthy lifestyle.
Step 1: Pre-Soak Seeds (Not all seeds)
Pre-soaking is important for some seed varieties. (View the Grow Guide Chart below) It helps soften the outer membrane. This allows the MicroGreen a head start. To pre-soak pour the seeds in a bowl with non-chlorinated water overnight.
Step 2: Soak Pad

Before use, soak 1 Coca Coir pad in 1 tray. Place on top of four spacers (Straws that came with your kit.) Soak for 12 hours in non-chlorinated water.
(Optional) Spray new pads with food grade Hydrogen Peroxide to reduce any risk of microbes or cross contamination.
Note: If reusing trays and spacers, be sure to thoroughly wash between uses.
Step 3: Germinate Seeds
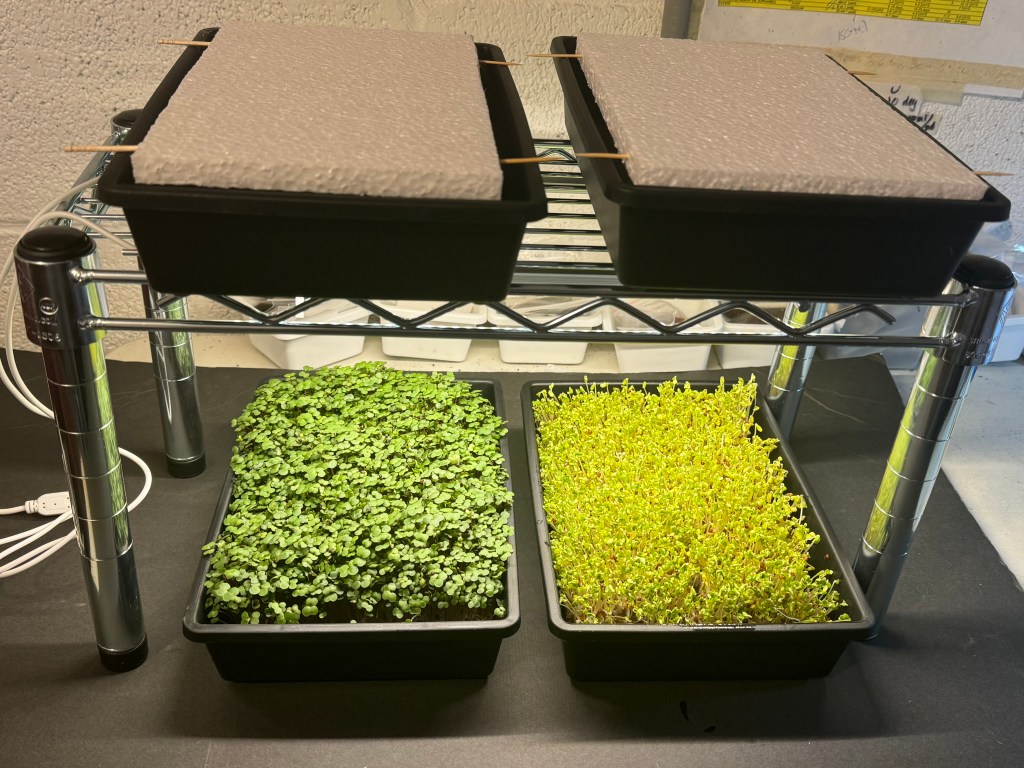
The germination phase of a seed occurs when the right moisture and temperature activate the plant’s life. Seeds are spread on the pad and watered with a mister. The seed shell cracks, allowing the root to grow into the Coco Coir pad, which helps it absorb water and supports the leaf growth that follows in the next vegetative phase.
During Germination phase:
- Make sure you have drained any excess water left over from soaking the pad.
- Open the seed packet and evenly distribute the seeds over the pad. The seed packets provided by Pure MicroGreens are measured to our recommended volume to cover the pad. Open the packet
- Spread the seeds evenly if they have clumped at all.
- Watering during germination is key to a full healthy tray of Pure MicroGreens at harvest.
- Watering during germination is done with spray mister (provided). Once a day is enough if the humidity level is good. You want to keep the seeds moist but not too wet.
- Puddling at the bottom of tray may happen but if it is more than 1/4″ deep then drain excess liquid. Rock the tray to check.
- Keep lid above tray (When not watering) Use tooth pricks (provided) to keep lid above tray.
- Spray a little water on the lid to create a moisture barrier.
- Germinating seeds do not need light. Do not put germinating seeds under lights. Use the top shelf with the lid covering the tray.
- View the Grow Guide Chart below for the ideal timing of each variety in the germination phase. Easy varieties like Arugula and Broccoli take 3 to 4 days, while others like Cilantro take 10 to 12 days.
- During this phase, respect the fact that the seeds are putting down roots. Do not move or disturb the growing seeds.
Step 4: Vegetative Stage


During Vegetative phase:
- Once your Pure MicroGreens have germinated and show light-colored leaves, they’re ready to move under the lights.
- Remove the lid and move them to a space on the lower space under the light.
- In the Deluxe Kit, your lights have a timer. We recommend using the 12-hour timer, so they turn on in the morning and off at night. For the basic kit, you can use your own timer or yourself around your own schedule.
- Water the MicroGreen during the vegetative phase mainly from the bottom by pouring, not misting. Avoid pouring directly on the pad to encourage the plants to draw water up from the roots.
- Misting may be fine for some plants, but it can cause mold or stem rot, which you should avoid. (See troubleshooting)
- Inspect your trays once a day. Ensure there is a small amount of water at the bottom, no more than 1/4 inch. If needed, add a little clean water, avoiding the pad, and gently rock the tray forward, backward, and side to side (~45 degrees) for a thriving urban garden of Pure MicroGreens.
Step 5: Harvest & Enjoy
As your MicroGreens are grown hydroponically, you can eat roots and all. If you are entertaining and want an upscale presentation, cut your greens with scissors at the base. This prevents the greens from clumping when added to your recipe.
You can also store your mature Pure MicroGreens in the Fridge for a week.